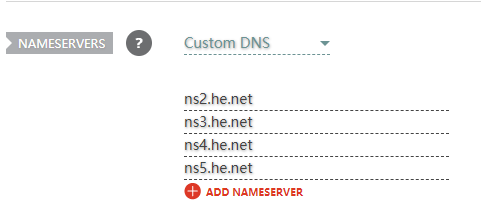
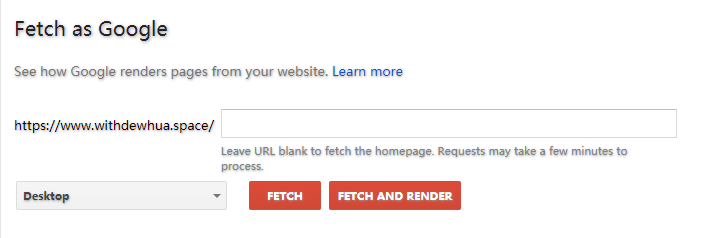
Loading... ## 前言 心血来潮,想通过`Github Pages`弄个个人博客,从别人的网站上无意看到了 [利用 GitHub Pages 快速搭建个人博客](https://www.jianshu.com/p/e68fba58f75c) 这篇文章,然后就动手试了下,算是基本成功了。感谢[qiubaiying](https://github.com/qiubaiying/qiubaiying.github.io)提供的教程和[Huxpro](https://github.com/Huxpro/huxpro.github.io)写的模板。 本文主要记录下自己瞎折腾的**archive 界面**、**绑定域名**和**谷歌收录**问题。 ## 增加 Archive 看到别人的博客里面一般都有归档和分类等页面,分类倒是无所谓,标签就可以了。但是归档倒是挺想弄一个的,可以按时间顺序看下自己发的文章。所以就谷歌搜了下教程,不是很懂,折腾了会,最后找到了 Huxpro 的`github`里的一个`issue`,解决了问题。 感谢[BruceZhaoR](https://github.com/BruceZhaoR/brucezhaor.github.io)提供的代码。 编写一个`archive.html` 文件放在根目录下,代码如下: ``` --- layout: page title : Archives description: "冰冻三尺,非一日之寒。" header-img: "img/archive-bg.jpg" --- {% for post in site.posts %} {% capture this_year %}{{ post.date | date: "%Y" }}{% endcapture %} {% capture this_month %}{{ post.date | date: "%B" }}{% endcapture %} {% capture next_year %}{{ post.previous.date | date: "%Y" }}{% endcapture %} {% capture next_month %}{{ post.previous.date | date: "%B" }}{% endcapture %} {% if forloop.first %} <legend id="{{this_year}}-{{this_month}}">{{this_year}} {{this_month}}</legend> <ul> {% endif %} <li><span>{{ post.date | date: "%F" }}</span> » <a href="{{ BASE_PATH }}{{ post.url }}">{{ post.title }}</a></li> {% if forloop.last %} </ul> {% else %} {% if this_year != next_year %} </ul> <legend id="{{next_year}}-{{next_month}}">{{next_year}} {{next_month}}</legend> <ul> {% else %} {% if this_month != next_month %} </ul> <legend id="{{next_year}}-{{next_month}}">{{next_year}} {{next_month}}</legend> <ul> {% endif %} {% endif %} {% endif %} {% endfor%} {% assign posts_collate = nil %} ``` `tilte` `description` `header-img` 等自己修改成自己需要的。 **注意**:只在该模板下我自己试验成功了,不确定别的能不能行。 ## 绑定域名 域名在[Namecheap](https://www.namecheap.com/)买的,用的[HE](https://dns.he.net)提供的免费 DNS 解析服务。 1. **namecheap 中填写 nameservers(HE 提供)**  2. **HE 中填写域名解析**  **说明**: - 添加了`A`记录和`CNAME`记录(`A`记录可以不填),`name`分别是`@`、`www`; - 填写`A`记录时`ip`地址可以和我一样,以确保能够开启`HTTPS`; - 注意`CNAME`填写`hostname`时需填写为`your-repository-name.github.io`。 3. **在`GIthub`里面填写`Custom name`**  **说明**:这样`Github`会自动生成`CNAME`文件,当然,你也可以直接编辑`CNAME`文件,在里面填写你的域名。 4. **等待 DNS 解析生效,生效后记得在`Github`里面勾选`Enforce HTTPS`**  **注意**:如果你在没有自己的域名前就已经弄过`gitalk`插件了,那么绑定自己的域名之后记得更新下授权的链接地址([点我直达](https://github.com/settings/developers))。 ## 谷歌收录 为了让自己的网站更快地被搜索引擎收录,可以自己主动向百度和谷歌提交网站。`site:your-domain`查看自己的网站有没有被收录,例如我的就是,`site:https://withdewhua.space` 由于`Github`禁止了百度对`Github Pages`的抓取,所以只向谷歌提交了网站。 - **提交站点地图** `jekyll`官方有生成站点地图的插件,可以去看看相关文档,我用了一个不依赖插件的`sitemap.xml`,代码如下: ``` --- layout: null sitemap: exclude: 'yes' --- <?xml version="1.0" encoding="UTF-8"?> <urlset xmlns="http://www.sitemaps.org/schemas/sitemap/0.9"> {% for post in site.posts %} {% unless post.published == false %} <url> <loc>{{ site.url }}{{ post.url }}</loc> {% if post.sitemap.lastmod %} <lastmod>{{ post.sitemap.lastmod | date: "%Y-%m-%d" }}</lastmod> {% elsif post.date %} <lastmod>{{ post.date | date_to_xmlschema }}</lastmod> {% else %} <lastmod>{{ site.time | date_to_xmlschema }}</lastmod> {% endif %} {% if post.sitemap.changefreq %} <changefreq>{{ post.sitemap.changefreq }}</changefreq> {% else %} <changefreq>monthly</changefreq> {% endif %} {% if post.sitemap.priority %} <priority>{{ post.sitemap.priority }}</priority> {% else %} <priority>0.5</priority> {% endif %} </url> {% endunless %} {% endfor %} {% for page in site.pages %} {% unless page.sitemap.exclude == "yes" %} <url> <loc>{{ site.url }}{{ page.url | remove: "index.html" }}</loc> {% if page.sitemap.lastmod %} <lastmod>{{ page.sitemap.lastmod | date: "%Y-%m-%d" }}</lastmod> {% elsif page.date %} <lastmod>{{ page.date | date_to_xmlschema }}</lastmod> {% else %} <lastmod>{{ site.time | date_to_xmlschema }}</lastmod> {% endif %} {% if page.sitemap.changefreq %} <changefreq>{{ page.sitemap.changefreq }}</changefreq> {% else %} <changefreq>monthly</changefreq> {% endif %} {% if page.sitemap.priority %} <priority>{{ page.sitemap.priority }}</priority> {% else %} <priority>0.3</priority> {% endif %} </url> {% endunless %} {% endfor %} </urlset> ``` 将`sitemap.xml`文件放在根目录下,在[Google Search Console](https://search.google.com/search-console/)里提交即可。  - **[验证`HTML file`和`HTML tag`](https://search.google.com/search-console/ownership)** 按页面里面提示操作即可。添加`HTML tag`时可添加在`_includes/head.html`中。  - **[Fetch as Google](https://www.google.com/webmasters/tools/googlebot-fetch)** 帮助谷歌机器人抓取内容页面,填写你要提交的网站文章链接即可。  --- ## 更新日志 - 2018-10-04 文中代码用`hugo`的`shortcodes`呈现;修改部分错误; - 2018-11-15 替换失效链接; 最后修改:2021 年 06 月 10 日 © 允许规范转载 赞 0 如果觉得我的文章对你有用,请随意赞赏