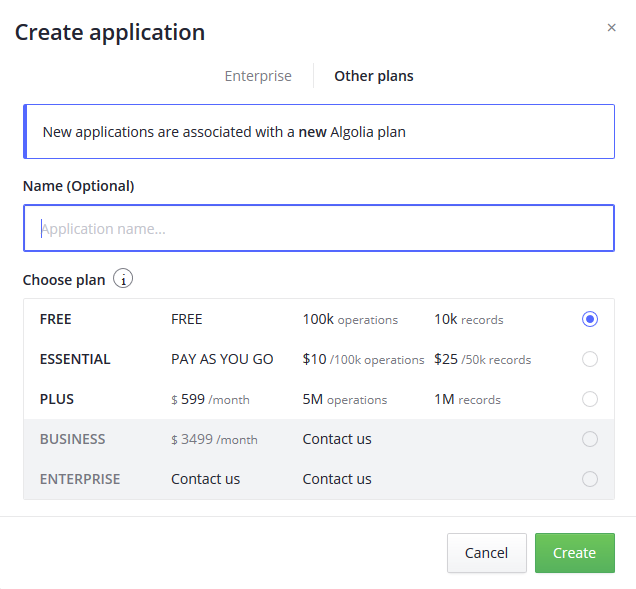
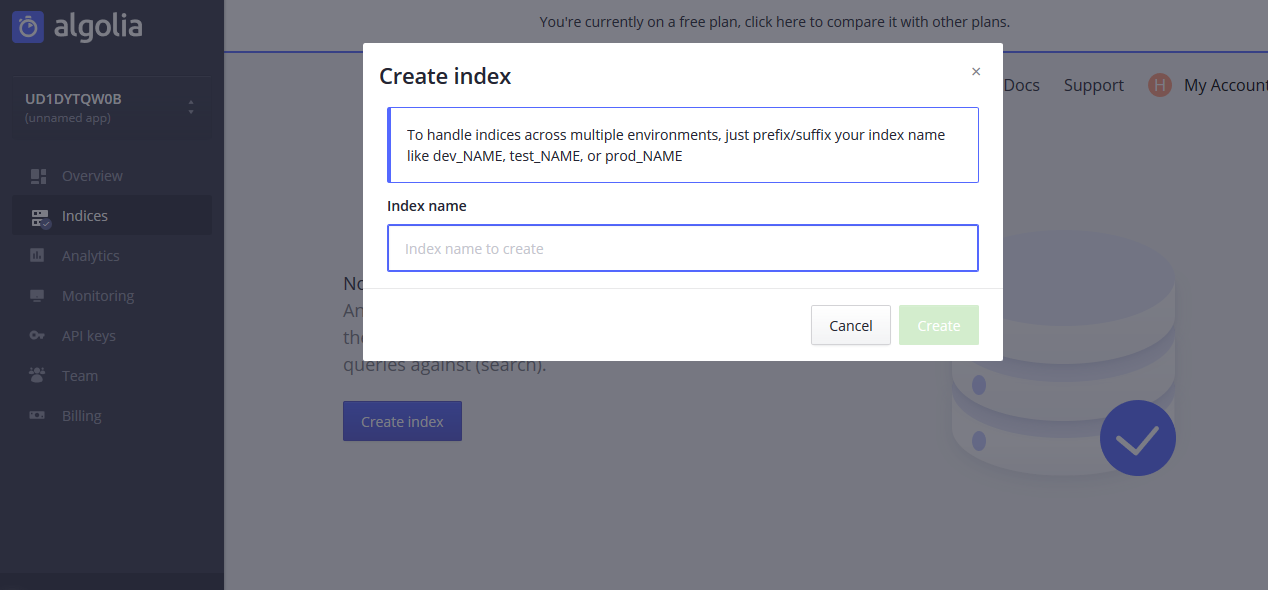
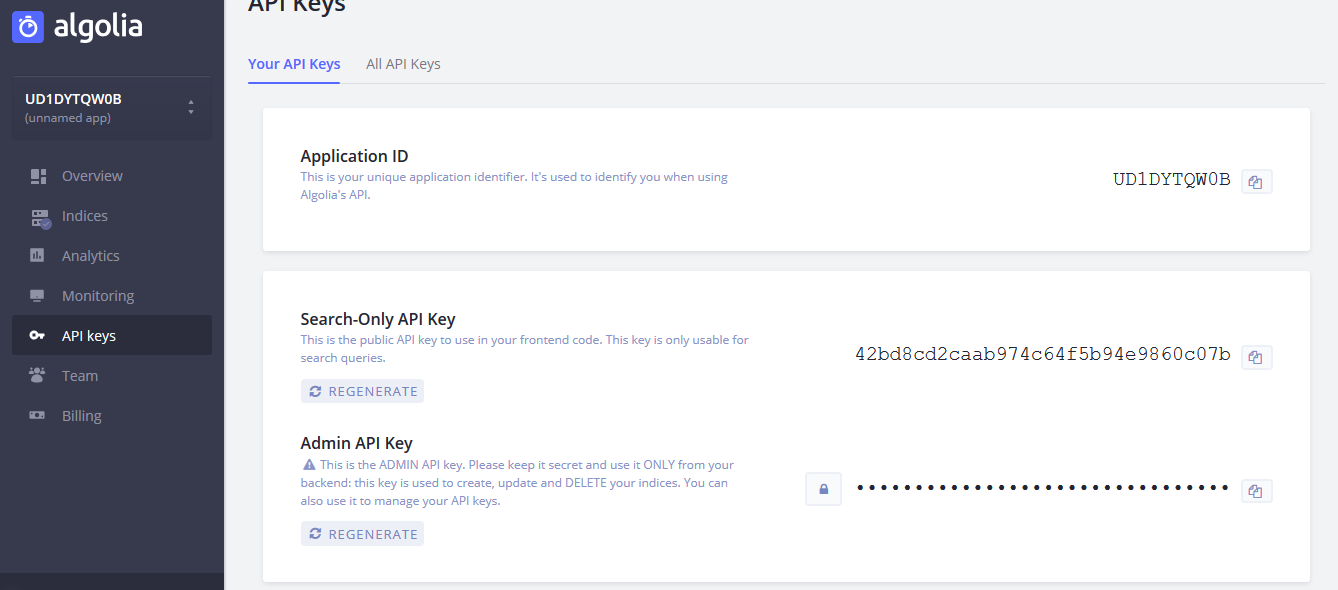
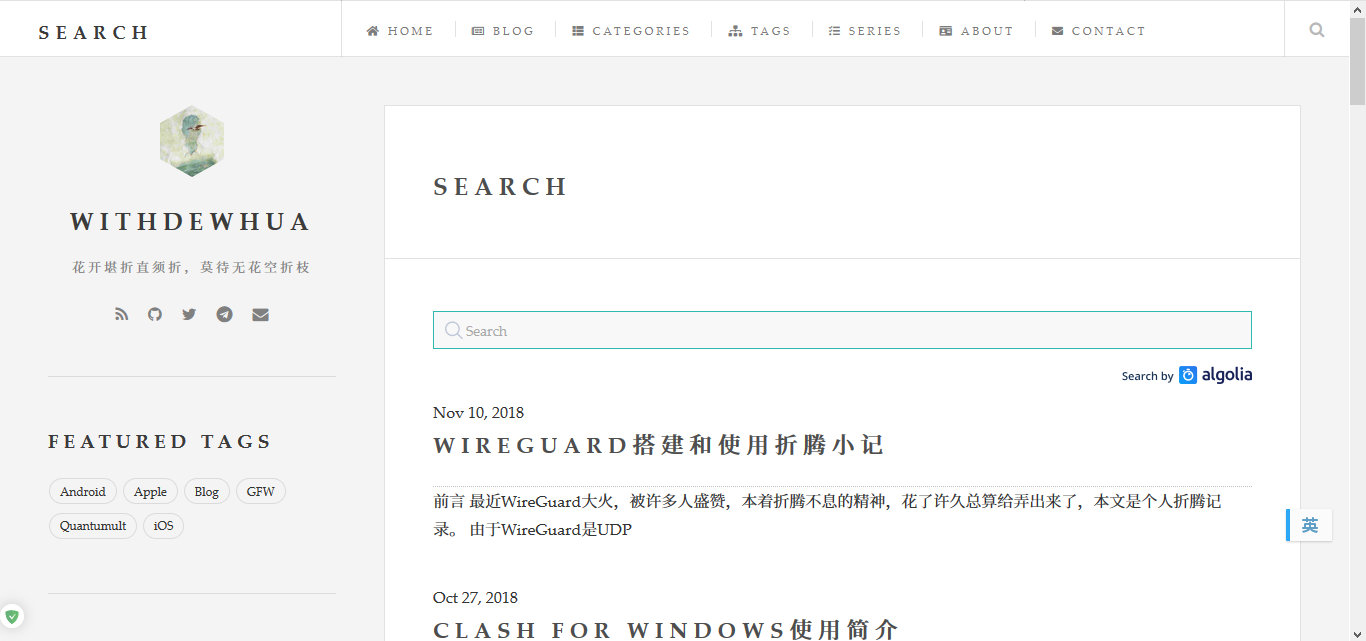
Loading... <div class="tip share">请注意,本文编写于 2635 天前,最后修改于 2243 天前,其中某些信息可能已经过时。</div> ## 前言 之前主题里面采用的是谷歌的站内搜索,感觉不是太好,所以想找找替代方案。[Hugo 官方文档](https://gohugo.io/tools/search/)里面提供了几种方案,最后采用了[Algolia](https://www.algolia.com/),以下为折腾过程。 [Algolia](https://www.algolia.com/)属于商业解决方案,但是提供了免费计划,对于我这种小站免费就够用了。 参考教程: - [Add Algolia Search To Hugo Static Website](https://code.luasoftware.com/tutorials/algolia/add-algolia-search-to-hugo-static-website/) - [Static site search with Hugo + Algolia](https://forestry.io/blog/search-with-algolia-in-hugo/) ## Index 配置过程 ### 生成 Algolia 端索引 - 前往[Algolia](https://www.algolia.com/)注册,然后前往[Algolia 主页](https://www.algolia.com/manage/applications),点击**NEW APPLICATION**,**Name**可选,方案选择**FREE**,然后创建,随后的地区选择邻近地区即可;  - 选择地区后会跳转到**Dashboard**,此时点击侧栏的**Indices**,然后点击**Create Index**,**Index name**自定义(例如自己的域名);  - 点击侧栏**API Keys**,记住以下的 keys,之后都会用到;  ### 本地生成搜索索引 1. 自定义输出格式,在`config.toml`中添加以下内容: ```toml [outputFormats.Algolia] baseName = "algolia" isPlainText = true mediaType = "application/json" notAlternative = true [params.algolia] vars = ["title", "summary", "date", "publishdate", "expirydate", "permalink"] params = ["categories", "tags","series"] ``` > `vars`是 Hugo 内置变量; > `params`是自定义变量,按自己情况增减。 2. 建立 JSON 模版,在`layouts/_default`中建立一个`list.algolia.json`文件,然后粘贴以下内容保存: ```json {{/* Generates a valid Algolia search index */}} {{- $.Scratch.Add "index" slice -}} {{- $section := $.Site.GetPage "section" .Section }} {{- range .Site.AllPages -}} {{- if or (and (.IsDescendant $section) (and (not .Draft) (not .Params.private))) $section.IsHome -}} {{- $.Scratch.Add "index" (dict "objectID" .UniqueID "date" .Date.UTC.Unix "description" .Description "dir" .Dir "expirydate" .ExpiryDate.UTC.Unix "fuzzywordcount" .FuzzyWordCount "keywords" .Keywords "kind" .Kind "lang" .Lang "lastmod" .Lastmod.UTC.Unix "permalink" .Permalink "publishdate" .PublishDate "readingtime" .ReadingTime "relpermalink" .RelPermalink "summary" .Summary "title" .Title "type" .Type "url" .URL "weight" .Weight "wordcount" .WordCount "section" .Section "tags" .Params.Tags "categories" .Params.Categories "authors" .Params.Authors)}} {{- end -}} {{- end -}} {{- $.Scratch.Get "index" | jsonify -}} ``` 3. 生成索引,在`config.toml`中添加以下内容: ```toml [outputs] home = ["HTML", "RSS", "Algolia"] ``` 4. 使用`hugo`命令,即可在`public`文件夹下看到`aligolia.json`索引文件。 ### 发送索引至 Algolia 我们将使用 NPM 包[atomic-algolia](https://www.npmjs.com/package/atomic-algolia)来帮助我们更新[Algolia](https://www.algolia.com/)上的 Index。 > 使用 NPM 需要安装 Node,可去[官网](https://nodejs.org/en/download/)下载 - 在博客项目文件夹下,`cmd`或者`bash`里执行以下命令: ```bash npm init // 初始化,不懂具体内容一路回车就好 npm install atomic-algolia --save ``` 执行完后会生成 `node_modules` 文件夹(如果代码托管在 GitHub 的话,可以在`.gitignore`中添加`/node_modules`以忽略该文件)。在项目根目录下还会有一个`package.json`文件,打开该文件,在`scripts`下添加`"algolia": "atomic-algolia"`后如下: ```json "scripts": { "test": "echo \"Error: no test specified\" && exit 1", "algolia": "atomic-algolia" }, ``` 一定要注意`test`一行后需要添加英文逗号。 - 在博客项目根目录下建立一个`.env`文件,文件内容如下: ``` ALGOLIA_APP_ID={{ YOUR_APP_ID }} ALGOLIA_ADMIN_KEY={{ YOUR_ADMIN_KEY }} ALGOLIA_INDEX_NAME={{ YOUR_INDEX_NAME }} ALGOLIA_INDEX_FILE={{ PATH/TO/algolia.json }} ``` **注意**: 1. 实际填写时不需要添加花括号; 2. `PATH/TO/algolia.json` 默认应填写为`public/algolia.json`。 - 一切就绪后,使用以下命令即可更新[Algolia](https://www.algolia.com/)的 Index: ```bash npm run algolia ``` 没有报错的话就成功了。 ## 前端内容 Index 弄好之后,就差我们在自己的主题中运用[Algolia](https://www.algolia.com/)了。以下是我用的主题内容,可以根据自己情况进行修改。 - 建立`/search`页面: ```bash hugo new search/_index.md ``` 具体内容看情况修改; - 在`layouts/partials/`下建立`search.html`文件,内容如下: ```html <script src="https://cdn.jsdelivr.net/npm/instantsearch.js@2.7.1"></script> <script src="https://cdnjs.cloudflare.com/ajax/libs/moment.js/2.20.1/moment.min.js"></script> <link rel="stylesheet" type="text/css" href="https://cdn.jsdelivr.net/npm/instantsearch.js@2.7.1/dist/instantsearch.min.css"> <link rel="stylesheet" type="text/css" href="https://cdn.jsdelivr.net/npm/instantsearch.js@2.7.1/dist/instantsearch-theme-algolia.min.css"> <div id="search-box"><!-- SearchBox widget will appear here --></div> <!-- include algolia logo --> <img src="https://www.algolia.com/static_assets/images/pricing/pricing_new/algolia-powered-by-14773f38.svg" style="float:right"></img> <div id="hits" > <!-- Hits widget will appear here --> </div> <div id="pagination"> <!-- Pagination widget will appear here --> </div> <script> // initialize instantsearch const search = instantsearch({ appId: 'YOUR_APP_ID', apiKey: 'YOUR_SEARCH_ONLY_KEY', indexName: 'YOUR_INDEX_NAME', urlSync: true }); const hitTemplate = function(hit) { /* if (hit === null){ * return; } */ let date = ''; if (hit.date) { date = moment.unix(hit.date).format('MMM D, YYYY'); } let url = `${hit.url}`; const title = hit._highlightResult.title.value; let breadcrumbs = ''; if (hit._highlightResult.headings) { breadcrumbs = hit._highlightResult.headings.map(match => { return `<span class="post-breadcrumb">${match.value}</span>` }).join(' > ') } let content = "" ; if (hit._highlightResult.content){ content = hit._highlightResult.content.value; } else{ content = hit.summary; } return ` <div class="post-item"> <span class="post-meta">${date}</span> <h2><a class="post-link" href="${url}">${title}</a></h2> <a href="${url}" class="post-breadcrumbs">${breadcrumbs}</a> <div class="post-snippet">${content}</div> </div> `; } search.addWidget( instantsearch.widgets.searchBox({ container: '#search-box', placeholder: 'Search' }) ); search.addWidget( instantsearch.widgets.hits({ container: '#hits', templates: { item: hitTemplate } }) ); search.start(); </script> ``` 该文件内容原出自[hugo-theme-cleanwhite](https://github.com/zhaohuabing/hugo-theme-cleanwhite/blob/master/layouts/partials/search.html),我只是稍加修改。`<style>`标签内容未放上来,可以自己根据需要修改。 - 修改 search 页面,在`layouts/search/`下建立文件`list.html`,具体内容根据自己网站修改,最重要的就是引入`search.html`,以下是我的`list.html`内容: ```html {{ partial "general-title" . }} {{ partial "header" . }} {{ partial "navbar" . }} <!-- Main --> <div id="main"> <article class="post"> <header> <div class="title"> {{ if $.Scratch.Get "h1" }} <h1><a href="{{ .RelPermalink }}">{{ .Title }}</a></h1> {{ $.Scratch.Set "h1" false }} {{ else }} <h2><a href="{{ .RelPermalink }}">{{ .Title }}</a></h2> {{ end }} {{ with .Description }} <p>{{ . }}</p> {{ end }} </div> </header> <div id="content">{{ partial "search" . }}</div> </article> </div> {{ partial "sidebar" . }} {{ partial "footer" . }} ``` - 在导航栏或其他位置添加搜索入口: ```html <form id="search" role="search" action="/search/"> <input type="text" name="q" placeholder="Search" /> </form> ``` 至此,就基本完成了,我的搜索界面效果如下:  ## 结束语 本来准备用 Serverless [Webtask Function](https://webtask.io/)来实现 Algolia Index 的自动化更新,但是建立 Webtasks profile 过程中验证码一直提示错误,暂时放弃了。 最后修改:2019 年 12 月 21 日 © 允许规范转载 赞 0 如果觉得我的文章对你有用,请随意赞赏
5 条评论
老板 我用的maupassant主题 能不能帮我看看添加搜索时你指教的css、js文件和添加搜索框入口的代码分别放到哪个文件去
不好意思,建议你自己多摸索摸索吧,已经没在用 hugo 了,自然也不会花时间在一个自己不会用的主题上。
没整出来
json模版报错呀
Error: “D:\Devlop\website\config_default\list.algolia.json:1:1”: unmarshal failed: invalid character ‘{‘ looking for beginning of object key string
路径搞错了,json路径应该在主题目录里,否则报错