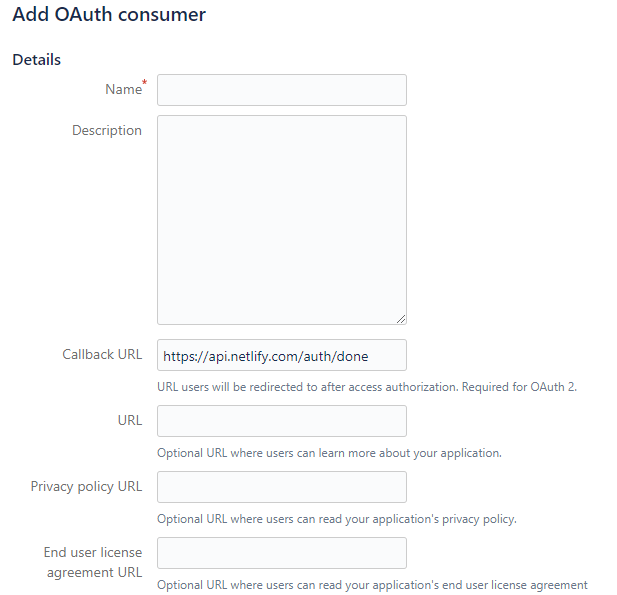
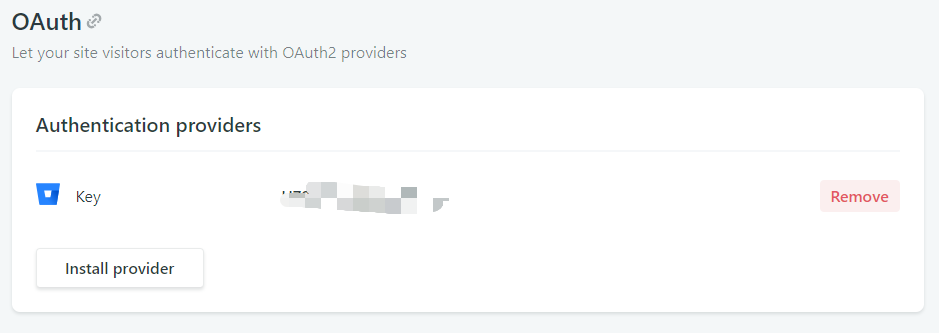
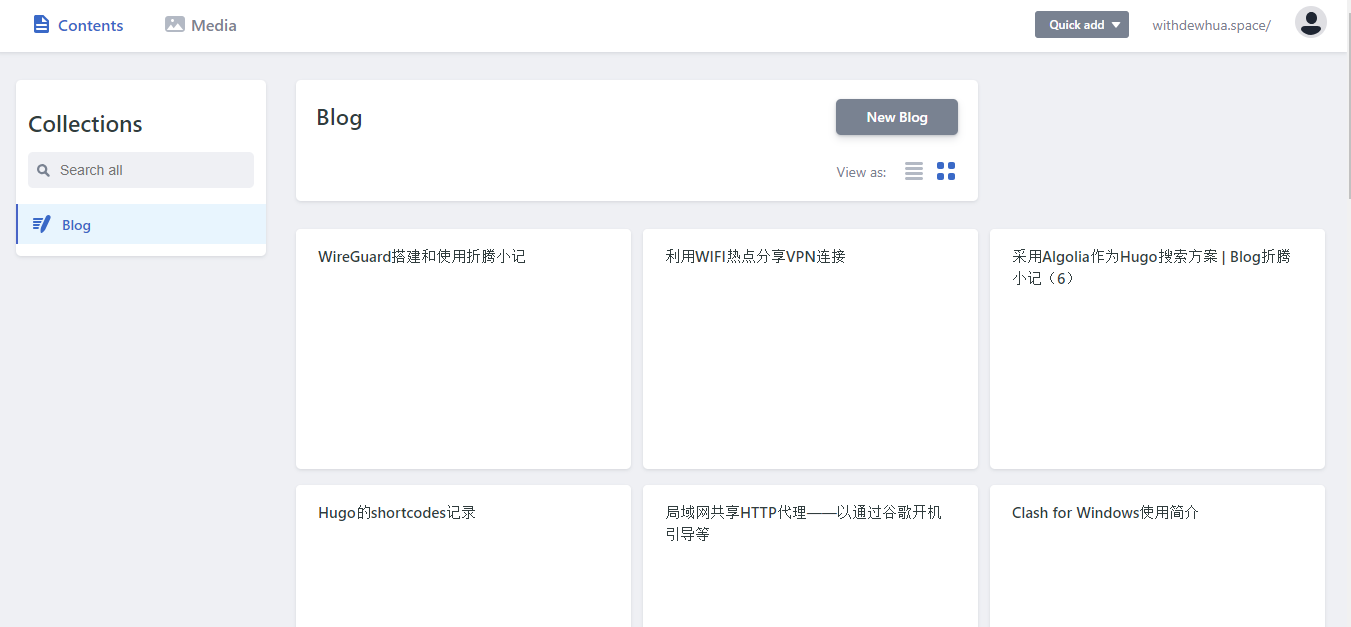
Loading... ## 前言 - 把博客托管在 Netlify 一段时间了,感觉很不错,今天又了解到 Netlify CMS 服务,决定给博客弄一个,按照[官方文档](https://www.netlifycms.org/docs/intro/)顺利搭建成功,以下是过程记录。 - 如果没有站点的话可以按照[官方模版](https://www.netlifycms.org/docs/start-with-a-template/)快速搭建一个带有 CMS 的站点;我的内容记录主要是在已有 Netlify 站点基础上添加 Netlify CMS,英文文档见[Add To Your Site](https://www.netlifycms.org/docs/add-to-your-site/)。 ## 搭建过程 ### 创建 admin 文件夹 该部分是最关键的内容,认真做完这一步基本就完成了 Netlify CMS 的搭建了。 admin 文件夹用来存储 Netlify CMS 文件,这些文件在站点部署后应该位于根目录下。不同的静态站点生成器存放 admin 文件夹位置可能不同,我是用的[Hugo](https://gohugo.io/),所以在`/static`下创建 admin 文件夹,且创建`index.html`和`config.yml`两个文件: ``` admin ├ index.html └ config.yml ``` #### 编辑`index.html` `index.html`即为访问`your-domain-name/admin`时展示的页面,内容可以如下: ```html <!DOCTYPE html> <html> <head> <meta charset="utf-8" /> <meta name="viewport" content="width=device-width, initial-scale=1.0" /> <title>Content Manager</title> </head> <body> <!-- Include the script that builds the page and powers Netlify CMS --> <script src="https://unpkg.com/netlify-cms@^2.0.0/dist/netlify-cms.js"></script> </body> </html> ``` #### 编辑`config.yml` `config.yml`用于编辑 Netlify CMS 的配置,我的项目仓库在 Bitbucket,和 GitHub/GitLab 在一些配置上有点区别,GitHub/GitLab 仓库的配置可见[官方文档](https://www.netlifycms.org/docs/add-to-your-site/)。 - Backend 对于 Bitbucket 仓库,Bitbucket `backend`可以直接使用 Bitbucket 账号登录 CMS,注意所有人需要仓库内容的读写权限才能登录后台界面。 ```yaml backend: name: bitbucket repo: owner-name/repo-name # 仓库路径 ``` 除了编写以上内容外,需要在 Bitbucket 注册一个`OAuth application`,以下以 Bitbucket 为例介绍注册过程,其他平台类似: 1. 进入账户**设置**界面,点击**OAuth**,找到**OAuth consumers**; 2. 点击**Add consumer**; 3. 除了**Callback URL**需填写`https://api.netlify.com/auth/done`,其他可以自定义。  完成注册后可以得到如下的**Key**和**Secret**,然后把这些内容添加到 Netlify 项目。  添加步骤如下: 1. 打开[Netlify 主页](https://app.netlify.com/)进入网站项目; 2. 找到**Settings** -> **Access control** -> **OAuth**; 3. 在**OAuth**下添加**Key**和**Secret**,如图。  - Media and public folder ```yaml media_folder: "static/img/post" # 存放图片的文件夹 public_folder: "/img/post" # 上传图片的src属性会以该路径开头 ``` - Collections ```yaml # 以下是我的Collections内容,如需要请根据自己的头文件内容自定义 collections: - name: "post" # 定义该collection的路径 label: "Blog" # 后台显示的名字 folder: "content/blog/2018" # 文章存放文件夹 create: true # 允许创建新文件 slug: "{{slug}}" # 文件名字模版,{{slug}} 取自title fields: # 定义front matter的显示与数据类型 - { label: "Title", name: "title", widget: "string" } - { label: "Author", name: "author", widget: "string", default: "WithdewHua", } - { label: "Type", name: "type", widget: "string", default: "post" } - { label: "Categories", name: "categories", widget: "list" } - { label: "Tags", name: "tags", widget: "list" } - { label: "Series", name: "series", widget: "list", required: false } - { label: "Publish Date", name: "date", widget: "datetime" } - { label: "Lastmod", name: "lastmod", widget: "date", default: "", required: false, format: "YYYY-MM-DD", } - { label: "Description", name: "description", widget: "text", required: false, } - { label: "Featured Image", name: "featured", widget: "image", required: false, } - { label: "Featured Alt", name: "featuredalt", widget: "string", required: false, } - { label: "Featured Path", name: "featuredpath", widget: "string", default: "img/post", required: false, } - { label: "Slug", name: "slug", widget: "string", required: false } - { label: "Draft", name: "draft", widget: "boolean", default: false, required: false, } - { label: "Show TOC", name: "showtoc", widget: "boolean", default: true, required: false, } - { label: "Post Content", name: "body", widget: "markdown" } ``` 更多的`Widgets`和`Collections`内容可参考[Widget Doc](https://www.netlifycms.org/docs/widgets/)和[Collection Reference Doc](https://www.netlifycms.org/docs/configuration-options/#collections)。 ### Netlify 设置 #### 允许 Identity 服务 1. 进入 Netlify **Settings** -> **Identity**, 选择**Enable Identity service**; 2. 剩余选项内容可根据自己需要调整。 #### 添加 Netlify Identity 挂件 - 在`admin/index.html`和自己网站页面的`<head>`元素间(如我的网站中的`layouts/partials/header.html`)添加以下代码; ```html <script src="https://identity.netlify.com/v1/netlify-identity-widget.js"></script> ``` - 在自己网站页面的`</body>`元素前(如我的网站中的`layouts/partials/footer.html`)加入以下代码,用于验证后跳转回自己网站。 ```html <script> if (window.netlifyIdentity) { window.netlifyIdentity.on("init", user => { if (!user) { window.netlifyIdentity.on("login", () => { document.location.href = "/admin/"; }); } }); } </script> ``` 以上完成之后,将文件上传至 Bitbucket 仓库就全部完成了,可以进入`your-domain-name/admin`登录查看搭建好的后台界面了,以下是我的:  最后修改:2021 年 06 月 10 日 © 允许规范转载 赞 3 如果觉得我的文章对你有用,请随意赞赏
6 条评论
你这博客复制真恶心,我还是去 Hugo 官网吧。
兄dei太直接了,哈哈?
我觉得有点简陋,不好用。
应急用下,做点小修改之类的
nice,之前还在想怎么给Hexo加后台。
虽然我也看不太懂,但应该是在做你自己喜欢的事情,加油呐!祝好~